
The way I build the whole application
Posted date 2023-03-01
Everyone has their own way when building an application from scratch, and sometimes we’re not convenient with their way because each person has their own cozy method, so do I.
In this post I would tell you what I did for building an application from scratch, for now example we would build a Todolist application.
Defining what application we will build
Before we work on the application any further, we should define what application we’re gonna build, like what feature of the application needed, so that the next step can be easier.
Because the application is very simple, the features are as follows :
- Users create todo records.
- Users can mark the todo as finished or undo it as unfinished.
- Users can delete todo records.
We got the definition of application above, the more complicated the application, the more points we have to define.
Flow of application
Flow application describing how the application interaction with user from start to the end, you can create flow application just using notes, or using diagram.
Based on Define of the application, we can write down the flow application using diagram like this :
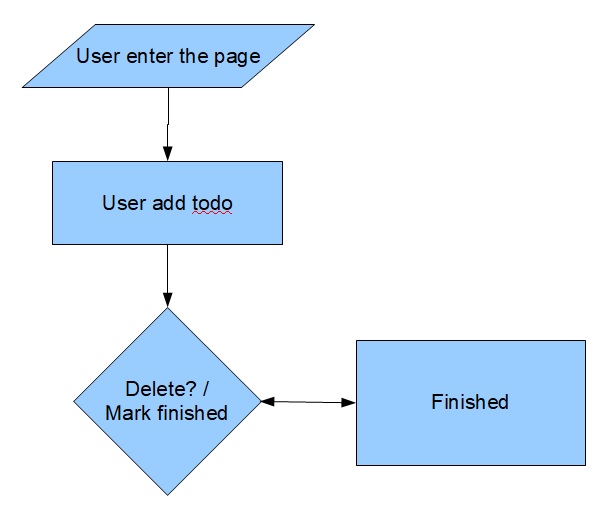
as you can see above, we define all the required application features into workflows the application :
- User enter the page
- User create new todo
- User mark as finished todo
- User mark as unfinished todo
- User delete todo
- User delete all todo completed
Mindmap
Mind map explaining what information, what element, and what user interface (UI) that we’re gonna show to users when he enter the page.
Based on flowmap application, we can see that all we need is only one page, in my vision the mind map of application just contain only :
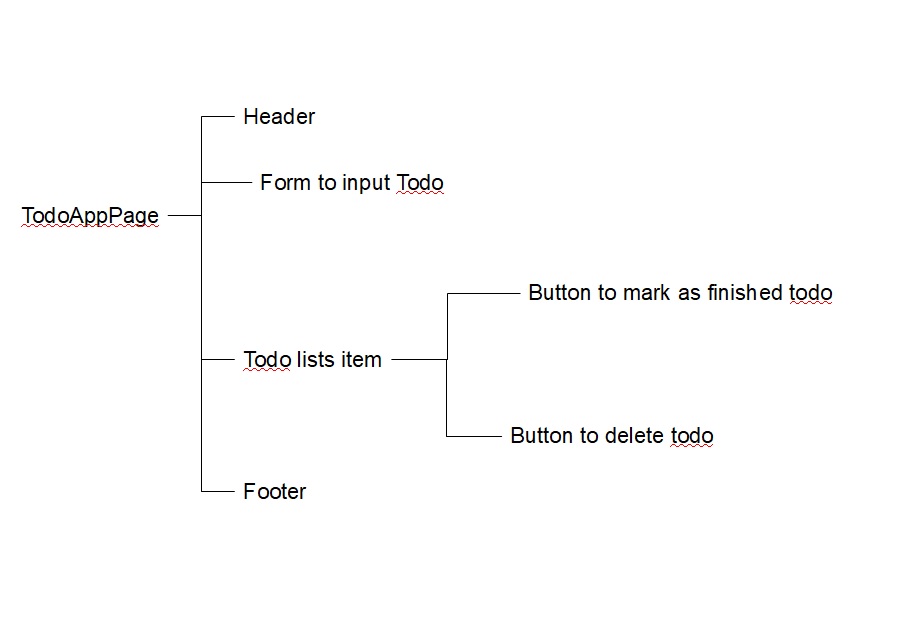
When user enter our application, we present a page with elements :
- At the top of the page we’re gonna show header of our Application
- Under header element we will put form element that user will type and enter new to do in it.
- When the todo lists contain todo, we will show button that can delete all todo finished.
- Below the form element we will show all todo lists the user input.
- Inside todo element we will put 2 button, the button to mark todo as finished and the button to delete todo
- And at the bottom of the page we will show footer.
The mind map above also makes us easier when making the sketch view, the initial design as the basis of full design.
Sketch
The sketch view just a simple display, the initial design for our application, without coloring, without typography and based on it, we can do full design of application.
Based on the mindmap we can draw sketch like so :
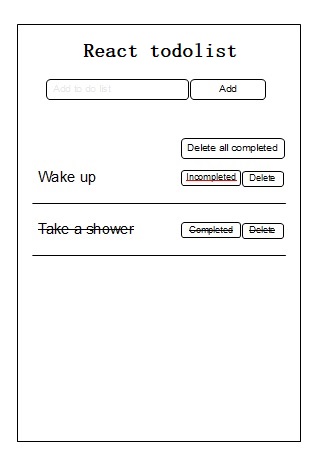
We add button delete all completed so user can easily delete all completed todo insted of delete it one by one.
Design
After we draw the sketch design, we have view of the full design of application, we have to define the sketch into a completed design, the completed design make it easier for us when we build a frontend application.
You can use one of many tools like Figma, Adobe XD, InVison, and so on to work on designs. We did a design using figma, and here are the end results :
.png)
I do not explain in detail how to design it, likes how to create rounded line, button and etc, because it will takes a very long session.
Preparation to do Frontend application
Now the time has come, we’re gonna coding frontend application, but before we doing that process, it would be better if we’re analyze the design and got the conclusion what elements will we create.
This is how I analyze the design and got conclusion what element that I would create :
.png)
As seen above, we will create as many as 5 components namely :
- Header.
- Button.
- Form.
- Todo.
- Todolists.
Coding Frontend application
There are many types of framework and programming language to create a frontend application, I considered choosing the hype framework called React that uses javascript language for building this app.
I don’t tell you how to setup a new project frontend application, what code editor I use, and etc that we can’t tell you detail here.
To make this post not too long, I just tell you how I build the each component application.
The structure of frontend application would look like so :
├── src
│   ├── components
│   │   ├── elements
│   │   │   ├── Button
│   │   │   │   ├── index.css
│   │   │   │   ├── index.jsx
│   │   │   ├── Form
│   │   │   │   ├── index.css
│   │   │   │   ├── index.jsx
│   │   │   ├── Header.jsx
│   │   ├── parts
│   ├── App.css
│   ├── App.jsx
│   ├── favicon.svg
│   ├── index.css
│   ├── logo.svg
│   ├── main.jsx
├── node_modules
├── .gitignore
├── index.html
├── package.json
├── package-lock.json
└── vite.config.js
Let’s start by creating the header component
The header component will contain simple code that will return element h1 with text React todolist as head of application.
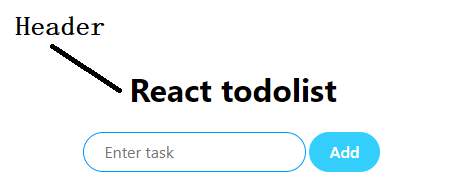
Create Header.jsx file with following content :
import React from 'react'

const Header = () => {
    return (
        <header>
            <h1>React todolist</h1>
        </header>
    )
}

export default Header;
Create the button component
The button element, we will use in many places, like form, todo list and others.

Create a Folder name Button, and create index.css file, the style for Button component, this is the content of the file.
/* CSS */
.button-18 {
  align-items: center;
  border: 0;
  border-radius: 100px;
  box-sizing: border-box;
  color: #ffffff;
  cursor: pointer;
  display: inline-flex;
  font-family: -apple-system, system-ui, system-ui, "Segoe UI", Roboto, "Helvetica Neue", "Fira Sans", Ubuntu, Oxygen, "Oxygen Sans", Cantarell, "Droid Sans", "Apple Color Emoji", "Segoe UI Emoji", "Segoe UI Symbol", "Lucida Grande", Helvetica, Arial, sans-serif;
  font-size: 16px;
  font-weight: 600;
  justify-content: center;
  line-height: 20px;
  max-width: 480px;
  min-height: 40px;
  min-width: 0px;
  overflow: hidden;
  padding: 0px;
  padding-left: 20px;
  padding-right: 20px;
  text-align: center;
  touch-action: manipulation;
  transition: background-color 0.167s cubic-bezier(0.4, 0, 0.2, 1) 0s, box-shadow 0.167s cubic-bezier(0.4, 0, 0.2, 1) 0s, color 0.167s cubic-bezier(0.4, 0, 0.2, 1) 0s;
  user-select: none;
  -webkit-user-select: none;
  vertical-align: middle;
  color: #ffffff;
  margin-right: 3px;
}

.button-18:disabled {
  cursor: not-allowed;
  background: rgba(0, 0, 0, .08);
  color: rgba(0, 0, 0, .3);
}

.primary {
  background-color: #66ccff;
}

.primary:hover,
.primary:focus,
.primary:active {
  background-color: #3399ff;
}


.danger {
    background-color: #ff6666;
}

.danger:hover,
.danger:active,
.danger:focus {
background-color: red;
}


.warning {
    background-color: #ffff66e5;
    color: black;
}

.warning:hover,
.warning:active,
.warning:focus {
background-color: yellow;
}
Create index.jsx file with following content :
// import react
import React from 'react';
// import prop types
import propTypes from "prop-types";
// import style
import "./index.css"
// export button components
export default function Button(props) {
// button text value
const { value } = props
// array of class name
let className = []
// if the props button is primary
if (props.isPrimary) className.push("primary")
// if the props button is danger
if (props.isDanger) className.push("danger")
// if the props button is warning
if (props.isWarning) className.push("warning")
return (
<button
// id of button
id={props.id}
// style of button
style={props.style}
// when button clicked
onClick={props.onClick}
// class of button
className={["button-18", className].join(" ")}
// role of element
role="button"
>
{value}
</button>
)
}
Button.prototype = {
// is primary props type
isPrimary: propTypes.bool,
// is danger props type
isDanger: propTypes.bool,
// is warning props type
isWarning: propTypes.bool,
// value props type
value: propTypes.string,
// id props
id: propTypes.string,
// style props
style: propTypes.string,
// onclick prop types
onClick: propTypes.func,
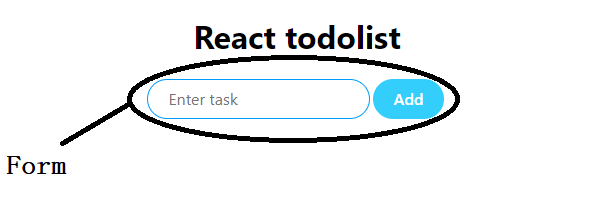
}Create component form to type new todo
The form where user can type new todo, and we’re gonna put some function in this element, like when user submit the form, we will put the new todo in to todolist and we will clear the form, so user can type new todo again.
Create folder name Form, then create index.css file, with the following content
.todo-form {
  border: 1px solid#3399ff;
  border-radius: 100px;
  box-sizing: border-box;
  color: #000000;
  display: inline-flex;
  font-family: -apple-system, system-ui, system-ui, "Segoe UI", Roboto, "Helvetica Neue", "Fira Sans", Ubuntu, Oxygen, "Oxygen Sans", Cantarell, "Droid Sans", "Apple Color Emoji", "Segoe UI Emoji", "Segoe UI Symbol", "Lucida Grande", Helvetica, Arial, sans-serif;
  font-size: 16px;
  line-height: 20px;
  max-width: 480px;
  min-height: 40px;
  min-width: 0px;
  overflow: hidden;
  padding: 0px;
  padding-left: 20px;
  padding-right: 20px;
  touch-action: manipulation;
  transition: background-color 0.167s cubic-bezier(0.4, 0, 0.2, 1) 0s, box-shadow 0.167s cubic-bezier(0.4, 0, 0.2, 1) 0s, color 0.167s cubic-bezier(0.4, 0, 0.2, 1) 0s;
  user-select: none;
  -webkit-user-select: none;
  vertical-align: middle;
  margin-right: 3px;
}
Create a file index.jsx, the form component with the following content
import React, { useState } from 'react'
import Button from "../Button"
import "./index.css"

export default function TodoForm(props) {
    const [userInput, setUserInput] = useState('')

    const handleChange = (e) => {
        setUserInput(e.currentTarget.value)
    }

    const handleSubmit = (e) => {
        e.preventDefault()
        props.addTask(userInput)
        setUserInput('')
    }
    return (
        <div>
            <form style={{ marginBottom: 10 }} onSubmit={handleSubmit}>
                <input class="todo-form" type="text" value={userInput} onChange={handleChange} placeholder="Enter task" />
                <Button isPrimary value="Add" />
            </form>
        </div>
    )
}
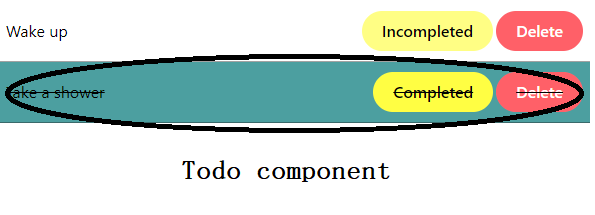
Create todo component
Todo component will contain button to delete todo and button to toggle todo as Completed or Incompleted, and the text of todo.
Create Todo.jsx file with the following content
import React from 'react'
import Button from "../elements/Button"

export default function Todo(props) {
    const { todo } = props;

    // function to handle button on todo when it clicked
    const handleClick = (e) => {
        // prevent all deafult function
        e.preventDefault()
        // function to toggle complete or incomplete
        if (e.currentTarget.className.includes("warning")) {
            props.toggle(e.currentTarget.id)
        }
        // delete todo
        else if (e.currentTarget.className.includes("danger")) {
            props.delete(e.currentTarget.id)
        }
    }

    // return component
    return (
        <div
            className={todo.complete ? "todo complete" : "todo"}
        >
            {todo.task}
            {todo.id && <span style={{ marginLeft: "auto" }}>

                <Button
                    isWarning
                    value={todo.complete ? "Completed" : "Incompleted"}
                    onClick={handleClick}
                    id={todo.id}
                />

                <Button
                    isDanger
                    value="Delete"
                    onClick={handleClick}
                    id={todo.id}
                />
            </span>}
        </div>
    )
}
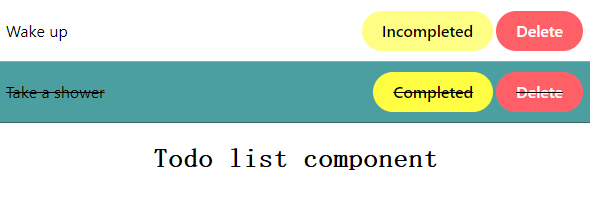
Create lists of todo component
The todo list component will looping data of todo list and will create todo component for each todo data.
import React from 'react'
import Todo from "./Todo"
import propTypes from "prop-types";

export default function TodoList(props) {
    const { list } = props;
    return (
        <div className="todo-list-board">
            {list.length > 0 && list.map((todo) => {
                return (
                    <div key={todo.id}>
                        <Todo todo={todo} delete={props.deleteTodo} toggle={props.handleToggle} />
                    </div>
                )
            })
            }
            {list.length < 1 && <div>
                <Todo todo={{
                    id: false,
                    task: "Nothing todo",
                    complete: false
                }} />
            </div>}
        </div>
    )
}

// default props when parent passing no props
TodoList.defaultProps = [{
    id: "kosong",
    task: "nothing todo",
    complete: false
}]

// Todo proptypes
Todo.propTypes = {
    list: propTypes.object,
    handleToggle: propTypes.func,
    deleteAllTodo: propTypes.func,
    deleteTodo: propTypes.func
}
Combining all component
We will combine all component that we create, so it becoming the whole front application and work like we expected.
Create a file App.css style for default web with the following content
.App {
  text-align: center;
}

button {
  font-size: calc(10px + 2vmin);
}

.container {
  border: 5px solid black;
  border-radius: 10px;
  margin: 10px auto 0 auto;
  max-width: 600px;
  min-height: 95vh;
  word-wrap: break-word;
}

.todo {
  border-bottom: 1px solid rgba(34, 33, 33, 0.418);
  padding: 10px;
  display: flex;
  align-items: center;
}

.todo:hover {
  background-color: lightgray;
}

.complete {
  background-color: cadetblue;
  text-decoration: line-through;
}

.todo-list-board {
  text-align: left;
}
Create App.jsx file, that will combine all component
import './App.css'
import { useState } from 'react'
import Button from "./components/elements/Button";
import Header from "./components/elements/Header";
import TodoList from "./components/parts/TodoList";
import TodoForm from "./components/elements/Form";

function App() {
  const [todo, setTodo] = useState('');

  // Toggle comoplete todo
  const handleToggle = (id) => {
    // console.log(id)
    let mapped = todo.map((task) => {
      return task.id === + id ? { ...task, complete: !task.complete } : { ...task }
    })
    setTodo(mapped)
  }

  // Delete all todo that completed
  function deleteAllTodo() {
    let filtered = todo.filter((task) => {
      return !task.complete
    })
    setTodo(filtered);
  }

  // delete particular todo
  function deleteTodo(id) {
    let filter = todo.filter((task) => {
      return task.id !== +id
    })
    setTodo(filter)
  }

  const addTask = (userInput) => {
    let copy = [...todo];
    copy = [...copy, { id: todo.length + 1, task: userInput, complete: false }]
    setTodo(copy)
  }

  return (
    <div className="App">
      <div className="container">
        <Header />
        <TodoForm addTask={addTask} />
        <span style={{ display: 'flex', marginBottom: 15 }}>
          {
            todo.length > 1 && <Button onClick={deleteAllTodo} isDanger style={{ marginLeft: 'auto' }} value="Delete all completed" />
          }
        </span>
        <TodoList list={todo} handleToggle={handleToggle} deleteAllTodo={deleteAllTodo} deleteTodo={deleteTodo} />
      </div>
    </div>
  )
}
export default App
The front end application is completed, we can do manipulation data for now, but the data is temprorary because we don’t store it to any database.
We need to build backend application to store all data that we’re going to do in the next step.
Designing backend application
As previously, before we do coding for backend applications, it would be better to analyze what data to store and what service that front end application needed.
Based on design application, we just need data structure to store as below
- Id (Unique identity of record).
- Todo (Value of todo).
- isCompleted (The mark of todo is that completed or no).
Whereas the service of backend we’re just need :
- Service to create new todo
- Service to mark todo as complete or incomplete
- Service to delete todo
Creating database based on data structure
Because we already know how data structure needed, We can create database first before we do code for backend application I decided to use mysql database for this application among many choices database management system, this is the database view that I setup :
+-------------+------------+------+-----+---------+----------------+
| Field       | Type       | Null | Key | Default | Extra          |
+-------------+------------+------+-----+---------+----------------+
| id          | bigint(20) | NO   | PRI | NULL    | auto_increment |
| todo        | text       | NO   |     | NULL    |                |
| isCompleted | tinyint(1) | NO   |     | 0       |                |
+-------------+------------+------+-----+---------+----------------+
Coding for backend application
There are many programming languages for creating backend applications. I considered using PHP, a popular language since 1995, the folder structure would look like :
├── .htaccess
├── Connect.php
├── index.php
└── Model.php
let’s get started.
File connection from app to database
Create a file Connect.php, the file to connecting application to database.
<?php
// The variable to connect to database
$host = "localhost";
$user = "root";
$pass = "";
$db   = "todos";

//Create objek mysqli to make a connection and save it into variable $mysqli
$mysqli = new mysqli($host, $user, $pass, $db);

?>
.htaccess file to redirect all request to index.php
.htaccess file that will rule apache server
RewriteEngine On # Turn on the rewriting engine
RewriteRule ^index/?$ index.php [NC,L]
RewriteRule ^index/([0-9]+)/?$ index.php?id=$1 [NC,L]
Model application
The Model is the part of MVC which implements the domain logic. In simple terms, this logic is used to handle the data passed between the database and the user interface (UI).
The Model is known as domain object or domain entity.
Create Model.php with the following content :
<?php
require_once "Connect.php";
class Todo
{

   public  function get_todos() {
      global $mysqli;
      $query="SELECT * FROM todos";
      $data=array();
      $result=$mysqli->query($query);
      while($row=mysqli_fetch_object($result))
      {
         $data[]=$row;
      }
      $response=array(
                     'status' => 1,
                     'message' =>'Get List todo Successfully.',
                     'data' => $data
                  );
      header('Content-Type: application/json');
      echo json_encode($response);
   }
   public function get_todo($id=0) {
      global $mysqli;
      $query="SELECT * FROM todos";
      if($id != 0)
      {
         $query.=" WHERE id=".$id." LIMIT 1";
      }
      $data=array();
      $result=$mysqli->query($query);
      while($row=mysqli_fetch_object($result))
      {
         $data[]=$row;
      }
      $response=array(
                     'status' => 1,
                     'message' =>'Get Todo Successfully.',
                     'data' => $data
                  );
      header('Content-Type: application/json');
      echo json_encode($response);

   }
   public function insert_todo(string $todo)
      {
         global $mysqli;
         $result = mysqli_query($mysqli, "INSERT INTO todos SET todo = '$todo', isCompleted = '0'");

         if($result)
         {
            $response=array(
               'status' => 1,
               'message' =>'Todo Added Successfully.'
            );
         }
         else
         {
            $response=array(
               'status' => 0,
               'message' =>'Todo Addition Failed.'
            );
         }
         header('Content-Type: application/json');
         echo json_encode($response);
      }

   function update_todo($id, string $todo, bool $isCompleted)
      {
         global $mysqli;
         $varToUpdate = "";

         if($todo) {
            $varToUpdate .= " todo = '$todo',";
         }

         if($isCompleted) {
            $varToUpdate .= " isCompleted = '$isCompleted'";
         }

         $result = mysqli_query($mysqli, "UPDATE todos SET $varToUpdate WHERE id='$id'");

         if($result)
         {
            $response=array(
               'status' => 1,
               'message' =>'Todo Updated Successfully.'
            );
         }
         else
         {
            $response=array(
               'status' => 0,
               'message' =>'Todo Updation Failed.'
            );
         }
         header('Content-Type: application/json');
         echo json_encode($response);
      }

   function delete_todo($id) {
      global $mysqli;
      $query="DELETE FROM todo WHERE id=".$id;
      if(mysqli_query($mysqli, $query))
      {
         $response=array(
            'status' => 1,
            'message' =>'Todo Deleted Successfully.'
         );
      }
      else
      {
         $response=array(
            'status' => 0,
            'message' =>'Todo Deletion Failed.'
         );
      }
      header('Content-Type: application/json');
      echo json_encode($response);
   }
}

 ?>
Index application and also the controller
A controller is responsible for controlling the way that a user interacts with an MVC application. A controller contains the flow control logic for an ASP.NET MVC application. A controller determines what response to send back to a user when a user makes a browser request.
Create index.php file, with the following content
<?php
require_once "Model.php";
$todo = new Todo();
$request_method=$_SERVER["REQUEST_METHOD"];
switch ($request_method) {
   case 'GET':
         if(!empty($_GET["id"]))
         {
            $id=intval($_GET["id"]);
            $todo->get_todo($id);
         }
         else
         {
            $todo->get_todos();
         }
         break;
   case 'POST':
        $id = $_GET['id'];
        $todo = $_POST['todo'];
        $isCompleted = $_POST['isCompleted'];

        if(!empty($id))
            {
                $todo->update_todo($id, false, $isCompleted);
            }
        else
         {
            $todo->insert_todo($todo);
         }
         break;
   case 'DELETE':
          $id=intval($_GET["id"]);
            $todo->delete_todo($id);
            break;
   default:
      // Invalid Request Method
         header("HTTP/1.0 405 Method Not Allowed");
         break;
      break;
}
?>
Integration between backend application vs front end application
We are almost done, we will add some function every application doing manipulation data like add todo, mark todo as completed or uncompleted, and delete todo, let’s get into it
Add some function to interact with backend application
Edit App.jsx and add some function like below :
// Toggle comoplete todo
  const handleToggle = async (id) => {
    const findTodo = todo.find((rec) => rec?.id === id)
    // send request to back end
    const response = await sendDataToBackEnd(id, !findTodo.isCompleted)
    if(response) {
      // renew lists todo in local application
      getAllTodo()
    }
  }

  // Delete all todo that completed
  async function deleteAllTodo() {
    const todoCompleted = todo.filter((task) => {
      return task.complete
    })
    //looping all completed todo
    for(let todo of todoCompleted) {
      await deleteTodo(todo.id)
    }
  }

  // delete particular todo
  async function deleteTodo(id) {
    let headersList = { "Accept": "*/*" }

   let response = await fetch(`http://localhost/todo?id=${id}`, {
     method: "DELETE",
     headers: headersList
   });
   if(response) {
    // renew lists of todo
    getAllTodo()
   }
  }
  // add new todo
  const addTask = async (userInput) => {

    // send data to back end application
    const response = await sendDataToBackEnd(false, userInput, false)

    if(response) {
      // renew lists of todo in local application
      getAllTodo()
    }

  }
  // function to get all todo from backend
  const getAllTodo = async () => {
    fetch("http://localhost/todo")
    .then((response) => response.json())
    .then((data) => setTodo(data));
  }

  // function to send data to backend application
  const sendDataToBackEnd = async (id, todo, isCompleted) => {
    let headersList = { "Accept": "*/*" }

   let response = await fetch(`http://localhost/todo?id=${id}?&todo=${todo}&isCompleted=${isCompleted}`, {
     method: "POST",
     headers: headersList
   });

   return response.status() === 200
  }
  // call function when application load
  useEffect(() => {
    getAllTodo()
  })
Conclusion
Impossible for somebody to build complex applications alone, because it is impossible for someone to be an expert in everything, this meme may can relate ✌️.
Ducks can’t move fast like dogs, can’t swim agile like fish, and can’t fly high like birds.
Building an application sometimes it’s fun, but when the application gets more complex you may need to prepare a lot of patience, because your intelligence, your skill, your IQ is not enough to finish the whole application alone.
This Post become simple because I didn’t tell you another process that very important likes :
- How to setting up a new project before we build the application.
- How to do unit testing for each file.
- How to do integration testing of the whole application.
- How to do End To End testing the whole application.
- How to test security of the application.
- How to create Continuous integration / Continuous deployment.
- How to deploy applications to the cloud or server.
- And many more that I don’t know yet 😀
Thanks For reading my post, hopefully can add to your insight about how to build a whole application from scratch 🙏